How to Troubleshoot and Fix a Leaking Compression Faucet

A leaking compression faucet isn’t the worst thing that could happen to you, but left ignored, a dripping faucet can cause a lot of damage and expenses, including corrosion, rust, and high utility bills.
Unfortunately, leaking faucet and pipes don’t fix themselves. In fact, over time they just get worse. It’s best to fix a leaking faucet as soon as you notice one. While faucet and toilet leaks don’t necessarily require professional service, if you are ever in any doubts, make sure you contact a professional before you make the situation a lot worse.
If you are feeling up to it, continue reading for how to troubleshoot and repair a leaking faucet.
How to Troubleshoot a Leaking Compression Faucet
Do you have a leaking faucet in your bathroom or kitchen? Don’t ignore it or take it lightly. Apart from losing a lot of water, the dripping sound may annoy you and will keep you up at night. A leaky faucet can become a nuisance if it is ignored. Fortunate, you can put a stop to that leaky faucet on your own with the help of a few tools and a few simple tips shared below.
But before we offer you some tips, it is very important to assess the condition of your faucet, and decide whether to fix it or ditch it. Most faucets designed for kitchen and bath are generally well engineered, well designed and can easily last a decade or two, depending on the condition of the water.
It’s not always wise to repair your faucet time and time again, especially if it has been in service for 15+ years. When you notice that the finishing on the faucet has become discolored or cracked, replace it. If you find the threads on the spout or aerator have been corroded or the internal parts of the faucets are so worn out that there is no improvement even after repair, get your faucet replaced immediately.
How to Fix a Leaking Compression Faucet

1. Identify your faucet
The first step is to figure out what kind of faucet you have—a compression faucet or a washerless faucet.
A compression faucet (aka stem or washer faucet) has two handles and one spout. If your faucet has separate hot and cold handles, it’s probably a compression faucet.
A washerless faucet usually has just one lever or knob that controls both the hot and cold water supplies. Washerless faucets can be either disc, valve, ball, or cartridge type.
Since faucets models vary depending on the manufacturer, it’s important to look up your specific faucet model to acquire identical replacement parts.
2. Turn off water supply
Find the individual water shut-off valve below the faucet and tighten it (turn to the right) to turn off the water. Open up both the hot and cold lines of the faucet to drain any remaining water. If you cannot successfully turn off the water at the individual valve, you may have to turn off the water at the main shutoff valve.
3. Disassemble leaking faucet
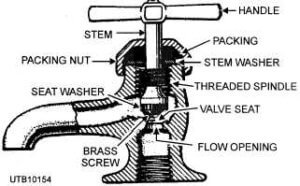
If you notice water leaking around the handle, try tightening the packing nut. If that doesn’t work, try replacing the packing.
If the faucet is leaking from the spout, you probably have a defective washer or valve seat. Try replacing the washer or valve seat.
To disassemble the leaking faucet, pull or pry off the handle’s cap (if it has one). Then, unscrew the handle screw and remove the handle.
4. Once the handle is removed, remove the stem and packing nuts
With the handle removed, you should be able to see the stem and packing nuts right below that. Use a wrench or pair of rib-joint pliers to turn the nuts counterclockwise (lefty-loosey) and lift off the stem and packing nuts.
To remove the stem, simply lift it straight out of the faucet body. Take note of any damaged or worn threads.
Be extra careful not to strip the nuts. If you are having any difficulties disassembling the faucet, contact a licensed plumbing professional.
5. Inspect seals, O-rings, and washers
Replace the stem if you notice any damage. If the stem looks to be in good condition, check the packing for wear. If any of the seals, O-rings or washers appear worn out, replace them.
6. Replace packing and washer
If you need to replace worn packing, first, remove the O-ring or packing washer and then slide on an exact copy. If you have graphite-impregnated twine, scrape it off and then wrap new twine clockwise around the stem.
7. Replace cracked or worn seat washer
If you see a cracked or worn seat washer, first remove the screw that connects the seat washer to the stem. Then, install an exact duplicate of the washer. If the threads are so worn that they cannot firmly hold the screw in place, use a swivel washer.
8. Replace worn valve seat
If you notice a pitted, worn, or corroded valve seat, remove it with a seat wrench. Insert the seat wrench into the valve seat and turn it to the left until it begins to lift out.
Your replacement valve seat should be an exact duplicate. Before installing the new valve seat, coat the threads with pipe joint compound.
If you cannot remove the valve seat, don’t force it—contact a professional plumber.
9. Reassemble faucet components
Once you have repaired the leak, reassemble the faucet and turn the water supply valve back on.
When reassembling the faucet, lubricate the stem threads with plumber’s grease. If you notice any word or stripped threads, consider replacing the stem.
Cleaning Faucet Aerators
Sometimes the problem with your faucet is not a leak, but rather a sluggish, spattering faucet. The trouble may be with the faucet aerator. When mineral, dirt, and other particles build up around the screen and disk of the faucet aerator, the flow can be blocked.
If you have minerals blocking the aerator, the best solution is to clean or replace the aerator and contact a plumber to see if you could benefit from a water softening system. If minerals are the problem, replace the aerator entirely.
If dirt is the problem, all you have to do is unscrew the aerator from the end of the spot and clean with a brush and soapy water. To clear out any clogged holes, you can use a pin or toothpick. Flush the aerator with water before putting everything back together.
If you are experiencing leaking or sluggish faucets, Contact Fix-It 24/7 for on-time faucet repairs and replacements: (303) 214-0277.
Service You Can Count On
We came from humble beginnings, having started as just a small family
business. And while we’ve experienced growth, Fix-It 24/7


